Links
Ertoel Roberta Electronic Spinner
The Woolery Roberta Jumbo Electronic Hand Spinner - Dual Power
The Skinny on Superwash and Non-Superwash Wool
- Home
- The MMW Blog
- The Skinny on Superwash and Non-Superwash Wool
- Mountain Meadow Wool
- https://mountainmeadowwool.com/blogs/the-mmw-blog/the-skinny-on-superwash-and-non-superwash-wool?page=2

Words to Increase You Wisdom from the Makers,
Wool is an amazing fiber! It is renewable, sheep grow a new fleece every year. It is both wam and cool, an active fiber that reacts to changes in body temperature. Wool is 100% biodegradable and will naturally decompose in soil in a matter of years, slowly releasing valuable nutrients back into the earth. It is 100% natural, with a blend of water, sunshine, air, and grass, sheep thrive to produce fiber and meat.
So, with this big picture in mind lets talk about superwash vs. non-superwash. With the convenience of clothes washers and dryers a demand for all apparel to be wash and dryable, decreased the demand for wool. Consumers were willing to forgo the amazing qualities of wool for ease in laundering their clothing. As a result, the process of super-wash was invented and now items made with superwash wool can be thrown in with the rest of the clothing in the washing machine and dried, although they will last longer if you don’t put them in the dryer.
The questions for you is…. do you know what is done to the wool to make it “super-wash?” I am embarrassed to admit that as a long-time fiberista I didn’t know the difference between regular wool and superwash, I was just in that consumer group that was relieved when my wool socks were caught in a pant leg and went through the wash/dry cycle they didn’t come out felted baby size.
Wool has Scales
If you look at a strand of wool through a microscope, just like your hair, wool has scales. Wool has more scales and those scales link together and allow us to spin the fiber into a long yarn. Those scales are also what keeps us from being able to agitate wool in the washing machine, or on the other hand, what allows us to make felt. As the wool is agitated those scales attach to each other more and more and this results in felting. To eliminate felting, the superwash process involves exposing the fiber to a chlorine gas that erodes the scales. After the scales are removed the wool is then coated with a plastic to fill in the places where the scales were removed.
After the superwash process of descaling and filling the descaled area with plastic, we have taken away several of the best qualities of wool. I don’t know about you, but when I learned the facts about superwash, it lost its appeal. Another thing that I have learned is that I was washing my wool garments too often. Wool fiber does not harbor scent, and under normal wear, unless you dribble egg yolk down the front of your sweater, with regular wear, a good washing every few months is quite sufficient.
How to Wash Wool Garments
We get asked quite frequently if our wool can be washed, and the answer is yes. Here is how I wash my wool sweaters. I have a top loading machine, I add a small amount of mild detergent and fill the tub with cold or warm water, leaving the washing machine lid open so it doesn’t move on the wash cycle. I hold the sweaters under water until they sink to the bottom of the tub. After soaking in the machine for 5-10 minutes I advance the washer to the spin cycle and close the machine lid. Because I use such a small amount of detergent, there is no need to go through a rinse soak unless the clothing is very dirty. I remove the wet sweater from the wash and hang it over my towel bar in the bathroom and leave it to dry. If you have a front loader use the gentle cycle and again a very small amount of mild detergent.
Currently Mountain Meadow Wool does not superwash any of our wool, we like to keep it as natural as possible. However, in the future we are considering investing in a sock machine, superwash wool may be necessary to satisfy those who demand a sock that can get caught in the pant leg and survive the trip through the wash.
How to Ball a Hank of Yarn - Knitting Tutorial
- Home
- The MMW Blog
- Mountain Meadow Wool
- https://mountainmeadowwool.com/blogs/the-mmw-blog/how-to-ball-a-hank-of-yarn?page=3
- How to Ball a Hank of Yarn

4 Tips to ball your yarn
Isn’t it exciting when you look in the mailbox and find your shipment of squishy, sheep smelling skeins of warmth and goodness!? If you are like me, you can’t wait to start casting on!
I want to help you get off to the best possible start with your project and give you some tips on how to get your skein of yarn into a ball or a cake.
1st Tip – When you get your yarn and slide off the Mountain Meadow Wool wrapper, don’t throw the wrapper away, it has information about the yards of the skein and most importantly the dye lot. If you need another skein you will want to know the weight of yarn, dye lot, and the name of the color!
2nd Tip – Inspect the skein:
Mountain Meadow Wool skeins have two ties. One tie is the two ends of the yarn tied together; the other ties is generally a colored tie that is figure 8ed through the yarn.

Look at the colored tie and make sure that all the yarn is going through the tie, and that no strands have gotten doubled back over the tie. When our team members twist the yarn, they look to make sure that all the yarn is going through the ties, but sometimes a strand will be missed. One strand in the wrong place can cause a lot of headaches, so don’t skip this step.

3rd Tip - Another look at the skein, this time spreading the yarn out so it will be flatter than in a bunch.
4th Tip – Do you have a yarn swift and ball winder?
If not, you can easily put it in a ball. If you have a yarn swift put the skein around the swift with a little bit of tension. Snip the colored tie and remove it. Snip the yarn ends just beyond the knot.


Determine which end is on the inside of the skein and which looks to be on the outside. Choose the outside strand; you may want to tuck the inside strand between the other yarn and the swift so that it doesn’t get tangled up as the swift goes around and around.
Attach the yarn to your ball winder, and turn the handle with consistent speed, don’t go too fast! When getting toward the end of the yarn slow down, you may need to apply some tension to the yarn as the last rounds come off the swift.
Don't have a yarn ball winder or swift?
Okay, you don’t have a fancy swift and ball winder, no problem! Here are a few options:
A) Set two kitchen chairs back to back and put the skein around the backs of the chairs, then spread the chairs apart to put a little tension on the skein, then proceed to cut the ties and make your ball.

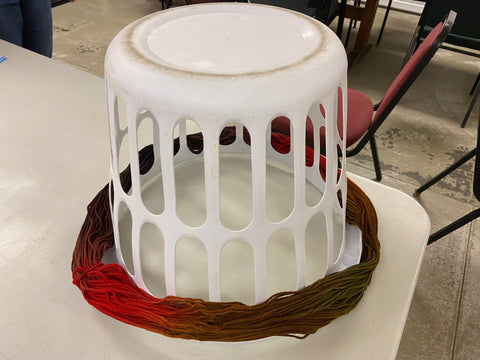
B) Put the skein over something round, such as a laundry basket that is upside-down.
C) My favorite method is to get the family involved by having a patient person put their hands inside the skein, with the yarn against the back of their hands and applying a little outward pressure as you go around and around making your ball.
A little bit of prep time will make this process a breeze and once you have your yarn in a ball you are ready to knit!
Knit On my fellow Fiberistas!!
Please be careful not to wind the ball too tightly. Start out by wrapping the first few yards around four fingers, then slide your fingers out, fold that loop in half, pinch it in the middle between thumb and your first three fingers, and wrap several yards around that, slide your fingers out. continue holding the ball and wrapping the yarn around the ball and your fingers as you go, sliding your fingers out every few yards until the ball is wound. If you wind too tightly, the wool will be stretched too tightly and will loose its loft and elasticity.
New knitters who are making a ball without a swift also need information on how to roll the yarn into a ball so the yarn stays springy and the yarn the knitter is knitting with is accessed from inside the ball and not the outside of the ball. I suggest to knitters to use a large empty pharmacy bottle of vitamins, for example. (Save those empty bottles and lids.) As you start to wind the ball, put the end inside the bottle, put on cap and wind the yarn around the center of the bottle until done. Now undue the cap, remove the yarn inside and slowly slide the ball of yarn off the bottle. Tuck the end of the yarn carefully into the ball of yarn. The yarn that was inside the bottle now become the beginning of your knitting project, coming from the center of the ball.